Sage 100 ERP Consultant Tip: How to Install Workstation Setup in Sage 100 2016
Sage 100 ERP Consultant: 6 Steps to Install Workstation Setup in Sage 100 2016 Question: In Sage 2016, how do I install Workstation setup on one of...
2 min read
Mike Renner Tue, Jul 25, 2017

 Sage 100 (formerly MAS 90/MAS200) Consultant Tip: 7 Steps in Sage 100 2016 to Install Workstation Setup
Question: Mike, we are a Sage 100 2016 user, and we need to add an additional workstation for a new employee. How do we install Workstation setup on one of our networked computers.
Answer: Here’s how you configure Sage 100 2016 to allow for an additional workstation. There are 7 steps to follow outlined below to install workstation setup.
Note: If you are planning to make any changes to your Sage 100, it’s highly advisable to discuss with your Sage 100 ERP Certified Consultant who should be able to help you. The instructions below are specific to Sage 100 2016. If you are running another version of Sage 100 and need to setup additional workstations, please consult your Sage Support resources or contact us. If you don’t currently work with a Sage 100 consultant, contact us and we are available to help.
STEP 1: First of all on the server that the Sage 100 2016 program is installed you will need to do a Share of the folder above the MAS90 folder. Example parent folder of the MAS90 folder might be called Sage 2016. You will want to right click on that folder, share it and give full permissions for the users that will be accessing Sage 100.
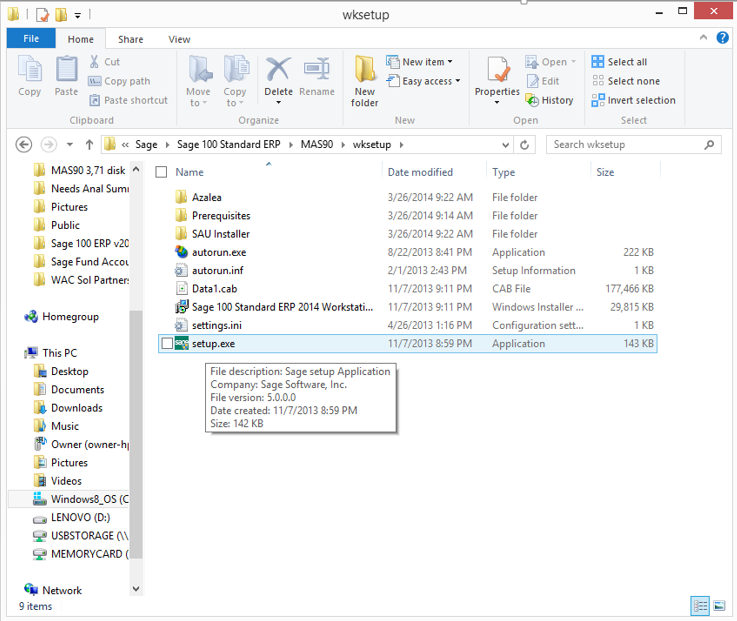
STEP 2: You will then log onto the Workstation that you will be running Sage 100 on and do a mapped drive to the parent folder, such as M:\\Server1\Sage 2016 which should then give you access to the folder. You will want to click down to the MAS90\wksetup folder and then run the Setup.exe program as an Administrator by right clicking on the program icon.
The program will run on the screen as shown below:
STEP 3: You will click the Next button:
STEP 4: Click the next button to run as Complete:
STEP 5: Click the Install button:
STEP 6: You will next want to install the Wks Update Standard, right click and install as Administrator, and follow installation until finished:
STEP 7: Once the program finishes you can find the new Sage 2016 icon in the Program files and can copy to the Computer Desktop:
If you have questions please contact us at www.caserv.com, email or 760-618-1395. Please stay tuned for more helpful Sage 100 ERP tips!
Written by Mike Renner: Partner of WAC Solution Partners - Greater Los Angeles, a Sage 100 ERP consultant and support provider based in Indio, CA.
Mike is an expert on ERP and fund accounting and supports Abila Fund Accounting and Sage 100 ERP with over 25 years in the accounting software industry. Mike is also a Sage Certified Trainer and a recognized leader in the design, implementation and support of ERP systems, including Sage.
Specialties: Sage 100 ERP (formerly Sage MAS90 / MAS200), Abila MIP Fund Accounting™, Acumatica, QuickBooks Pro Advisor
We republished this blog previously posted on August 2. 2016 because this issue is common occurance with Sage 100 users - Sage 100 2016 How to install workstation setup

Sage 100 ERP Consultant: 6 Steps to Install Workstation Setup in Sage 100 2016 Question: In Sage 2016, how do I install Workstation setup on one of...

As an ERP consultant who supports Sage 100 ERP clients, we get questions that we often share in our blogs when they are relevant to others. Today we...

Sage 100 Consultant Tip: What to do when Paperless Office won't print Sage 100 ERP consultant, we had a client who had a technical issue with...