1 min read
How to Set up Electronic Funds Transfer (EFT) in Sage X3
8 Steps to Set Up Electronic Funds Transfer (EFT) in Sage X3 More and more businesses are transacting money through Electronic Funds Transfer (EFT)...
3 min read
Jess Mann Tue, Sep 15, 2015

All transactions that affect a business’ financials must be recorded in their accounting system. With Sage ERP X3 it is automatic when a Purchase Invoice, Sales Invoice, Shipment, etc. are confirmed and posted to the system. In the setup of each module, you configure the specific account to automatically post certain transactions. Also, you have the ability to make changes to the account, customer/vendor, amount and description fields prior to the final post.
Miscellaneous transactions such as rent and expenses and journals can be manually entered and posted.
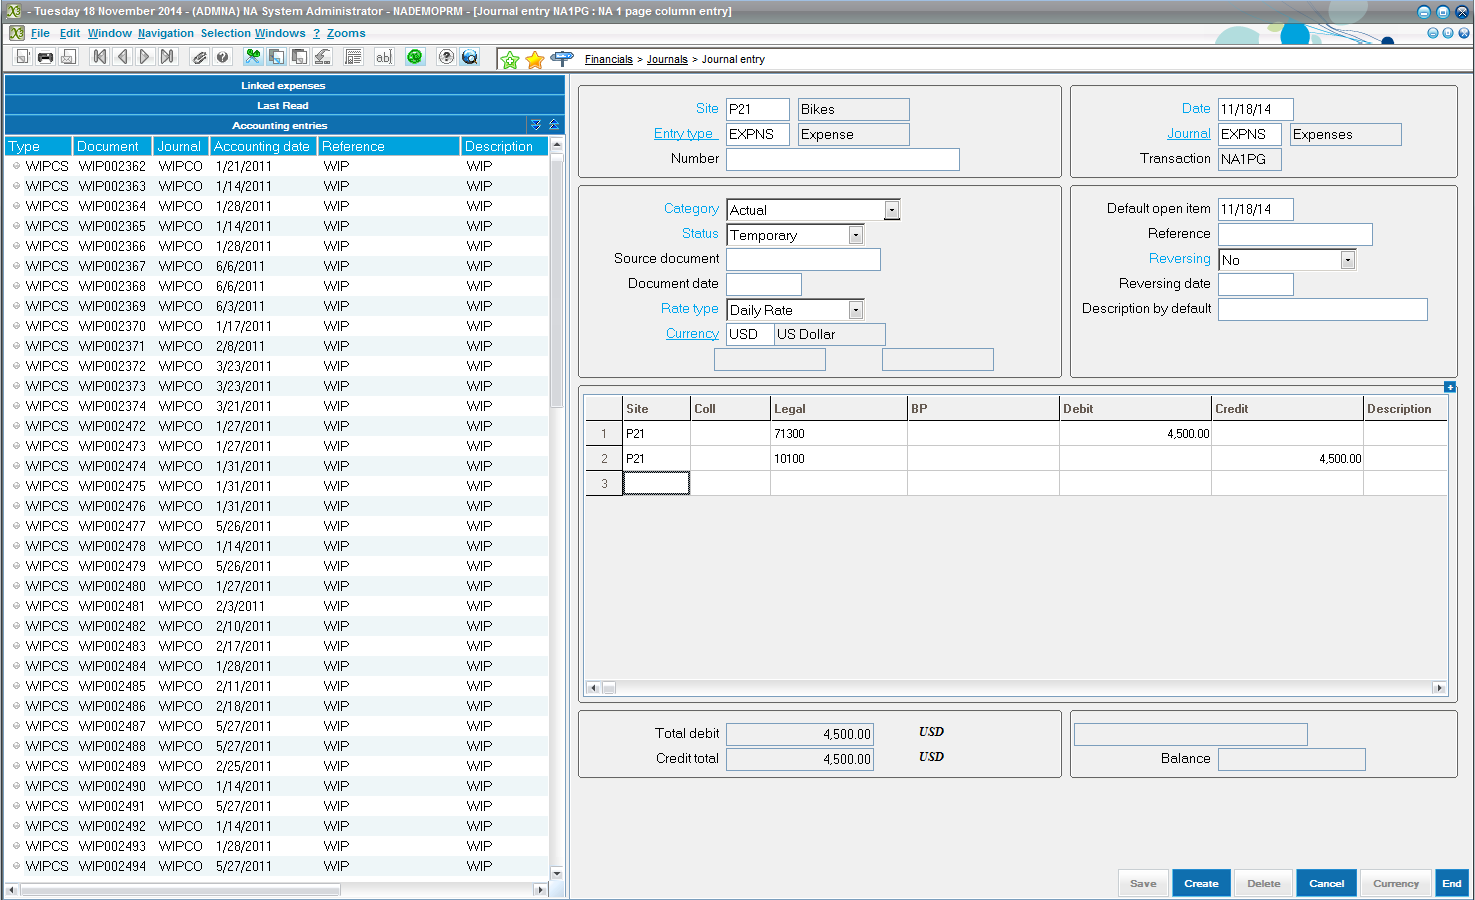
Below are the steps of creating a manual Journal entry, a Recurring Journal entry and a Reversing Journal entry in Sage ERP X3 v6.5:
The grid area shows the mandatory fields to be filled including Legal – to select the accounts concerned, Debit and Credit to record the amounts with descriptions for reference. Fields for analytical dimensions are also seen – select the appropriate Dimension, if any, against the line items.
Once these fields are filled, the Total Debit and Credit fields are populated at the footer. Make sure they are balanced, otherwise you get a warning message.
Click on Create button to create the entry in the system. When the Status is at ‘Temporary’, you can always make changes to the created entry.
To generate the same transaction on a regular basis, say to pay Rent every month, you can create a recurring journal ‘template’ which could run every month or any period to generate the journal entry. This process removes the hassle of creating the line items with details each time.
Hence this process includes a two-step process

• Follow the same steps as creating a manual entry except that the Category field is set to ‘Template’.
• Click Create to create the Template. Make a note of the Number generated (GEN000004)
• Next step is to complete the Setup of this recurring journal
• Open the path Setup > Financials > Accounting forms > Recurring entries
• Click New, give a Recurring Entry Code with a description
• Select the Template Journal same as the Entry Type in the Journal Entry screen. Select the Template from the list, the one created from the Journal Entry screen (GEN000004)
• Provide details of End date and the periodicity of generation of this journal entry
• Under Generation Tab, select the same Journal Type for Entry Type and Journal fields
• Click Create to create the save the Setup of this recurring journal
Now, to generate this recurring entry for every period,
• Open the path Financials > Current Processings > Recurring entries > Recurring Entries
• This screen would generate entries for multiple Recurring Journal Codes at once. For now, we will generate an entry only for one code ‘RENT’
• Define the Until date, the date up to which the recurring journals are to be generated.
• The generation type should be set to ‘Actual’
• Click OK to generate entry(ies)
Creating a Reversal Journal Entry
• Reversal entries can be created from an existing entry in two ways – Reversing individually, Mass Reversals
• To reverse an entry individually, open the entry from Financials > Journals > Journal Entry
• From the tool bar, click the Zooms menu to select Reversing
• Set the appropriate Generation Type with the Reversing Date
• Click OK to generate the Reversing Entry
To generate Mass Reversal of multiple entries, say at the beginning of the next Fiscal Year,
• Change the Reversing field option to ‘To Reverse’ for the set of entries you wish to reverse at a later time
• Define the Reversing Date of accounting the particular entry
• Save the journal entries whichever changed to ‘To reverse’
Now, to mass run the reversing entries,
• Open the path Financials > Current Processings > Reversals
• Set the appropriate parameters as desired including the range of entries within a Start and End date
• Click OK to generate reversal entries for all those entries which have been set to ‘To Reverse’ function
For any clarifications and support regarding this article or other Sge ERP X3 questions, feel free to contact Mantralogix at 1-866-320-8922 and any of our Sage ERP X3 Certified Consultants would be more than happy to assist you!
As a trusted technology partner, Mantralogix delivers enterprise software solutions to both Canadian and U.S. businesses. We are happy to receive your inquires for any types of services which you are looking for and will focus on ensuring your requirements are met. Please call us at 1-866-320-8922 or email us at info@mantralogix.com.
About Mantralogix
Mantralogix specializes in the implementation, support, and training of world-class ERP solutions from Sage, including Sage ERP MAS 500, Sage 300 ERP (formerly Accpac), and Sage ERP X3, Sage PFW, and Sage BusinessVision Accounting (BV). We also help with CRM, HRMS, custom development, hardware, and IT consulting and outsourcing. Mantralogix has in-house expertise in designing, developing and implementing solutions for financial, manufacturing and distribution verticals. Contact us today at 866-320-8922 or visit www.mantralogix.com
Another version of this article was previously posted on Matralogix’s Blog on March 6, 2015
http://insights.mantralogix.com/blog/using-journal-entries-in-sage-erp-x3

1 min read
8 Steps to Set Up Electronic Funds Transfer (EFT) in Sage X3 More and more businesses are transacting money through Electronic Funds Transfer (EFT)...

Sage X3 Consultant Question: Action Field Options I was working in the development tools in Sage X3 and I’ve been asked to update certain fields...

Sage ERP Consultant: 4 Steps to Make Customizations Patches in Sage X3 Throughout the year, Sage releases an occasional patch for Sage X3 in order to...